Breakpoint Management & Views
Overview
Breakpoints are the primary mechanism for stopping execution in the debugger. TEMU provides several tightly-integrated user interfaces for creating, inspecting and controlling breakpoints:
-
Gutter icons in disassembly and source-code panes.
-
A searchable breakpoint tree with context and properties.
-
Visual cues (colors, hover states) and a context menu for fine-grained control.
-
A separate Complex Breakpoints dock for multi-stage event patterns.
This document explains how to use those features from the user’s perspective. No knowledge of the underlying code is required; the descriptions concentrate on what you can do and how the interface behaves.
Breakpoint Terminology
A disassembly breakpoint refers to a specific memory address. A line breakpoint refers to a source-file/line pair. All breakpoints belong to a context (e.g. a software context or thread). Enabled breakpoints are active – the debugger will stop when they are hit. Disabled breakpoints remain visible but won’t pause execution.
Adding and Removing Breakpoints
Using the Gutter
When a disassembly or source pane is visible a narrow “gutter” runs down the left-hand side of the text.
-
Create/toggle – click the circle in the gutter next to an instruction (disassembly) or a source line.
-
An empty circle indicates no breakpoint; clicking it sets a new one.
-
A filled red circle denotes an enabled breakpoint; clicking it disables or removes the breakpoint depending on its current state.
-
Hover feedback – moving the mouse over the gutter shows a pale marker even if no breakpoint exists. This makes it easy to target a line.
Breakpoint Tree View
Open the Breakpoints / Watchpoints dock (normally tabbed with the Component Browser and Project Explorer on the left side of the window). The upper half of that dock lists the regular breakpoints.
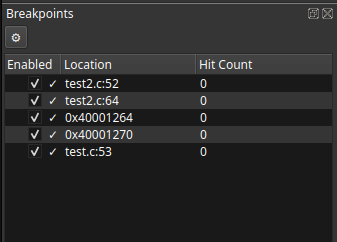
-
Add – use the toolbar
+button, choose “Add breakpoint” and enter an address or file/line. The current context is used by default. -
Enable/disable/delete – select one or more entries and use the toolbar buttons or the right-click context menu.
-
Navigate – double-click an entry or choose “Go to” from the menu; the disassembly/source view will scroll to that location and make it current.
-
Copy/Clear All – the menu provides clipboard copy and a “clear all” command to remove everything in one go.
For data-access stops, see Watchpoint Management.
Seeing Breakpoints in the Views
Colors & Icons
-
Enabled breakpoints appear as a solid red circle in the gutter.
-
Disabled breakpoints are grey, with a diagonal line through the circle.
-
Hover – when the mouse is over a line without a breakpoint, a faint red dot previews where a new breakpoint would appear.
-
Execution point – the currently executing line is highlighted with a distinct background color; this is separate from the breakpoint indicator.
These visual cues are theme-aware.
Disassembly View Behavior
The gutter plugin keeps breakpoints synchronized with the underlying model, so enabling or removing a breakpoint anywhere (gutter/tree/script) updates the display immediately.
Source View Behavior
-
Line-breakpoints appear as circles in the gutter beside the source line.
-
Clicking the gutter toggles the breakpoint for that line.
-
Multiple files – each open file has its own gutter and breakpoints; the tree view reflects all of them.
When you set a line breakpoint, the controller attempts to map the local file path to the target’s path using the project’s path-mapping rules – this means breakpoints survive rebuilds and directory renames.
Working with Breakpoint Properties
The breakpoint properties editor lets you:
-
Give a breakpoint a condition.
-
Specify whether it should trigger only after a certain number of hits.
-
Associate it with particular threads or contexts.
-
Add TEMU and Python scripts to individual breakpoints. These scripts trigger in the emulator, not the debugger.
See the TEMU scripting documentation: Scripting.
Access the dialog by right-clicking a breakpoint in the gutter or selecting “Edit” from the tree view context menu.
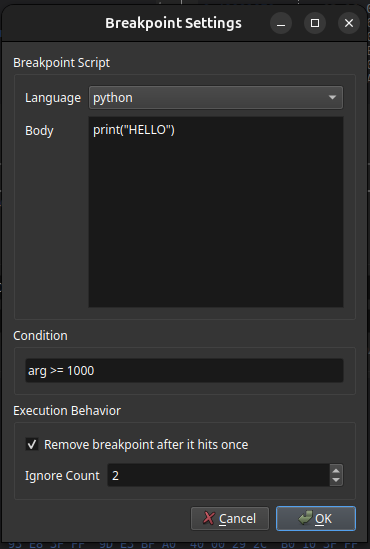
Breakpoint Settings Dialog
The dialog is split into three functional areas:
- Breakpoint Script
-
Lets you attach a script to the breakpoint. The Language field currently offers
pythonandtscript, and the script body editor uses syntax highlighting that follows the selected language. - Condition
-
An optional expression guard that must evaluate true before the breakpoint stops execution.
- Execution Behavior
-
Contains the Remove breakpoint after it hits once checkbox and the Ignore Count field.
In the disassembly gutter, right-clicking an existing breakpoint opens the same properties workflow for the address under the mouse.
Complex Breakpoints
Complex breakpoints are managed in a dedicated dock tab labeled Complex Breakpoints. Use that view when you need a pattern of multiple operations instead of a single stop point.
See Complex Breakpoints.
Tips & Tricks
-
Synchronize – if you’ve added breakpoints via a script or another tool, click the “Refresh” button in the tree view (or use the menu) to pull them into the UI.
-
Disable all – use the tree view’s toolbar menu to quickly disable all breakpoints without deleting them.
Troubleshooting
-
If a breakpoint does not appear where expected, verify that the disassembly pane is displaying the context you think it is (check the context selector at the top of the view).
-
Line breakpoints on generated code may not align with the source; use the navigator to jump to the physical address before setting one.